
Build and deploy your own ChatBot locally using Ngrok
A Storm in the AI World
The air was thick with tension in Silicon Valley. Tech giants and AI researchers were buzzing about a seismic shift in the industry—a new player had entered the game. Deep in China, an AI startup named DeepSeek was making waves, shaking the foundations of artificial intelligence as we knew it.
Meanwhile, developers across the globe were celebrating a different kind of revolution—Ollama, an open-source tool that let them run large language models (LLMs) on their local machines, giving them control like never before. But as the AI battlefield heated up, one unexpected casualty emerged: NVIDIA, the titan of AI hardware, saw its stock plummet in a historic market crash.
What was happening? And more importantly, what was China hiding?
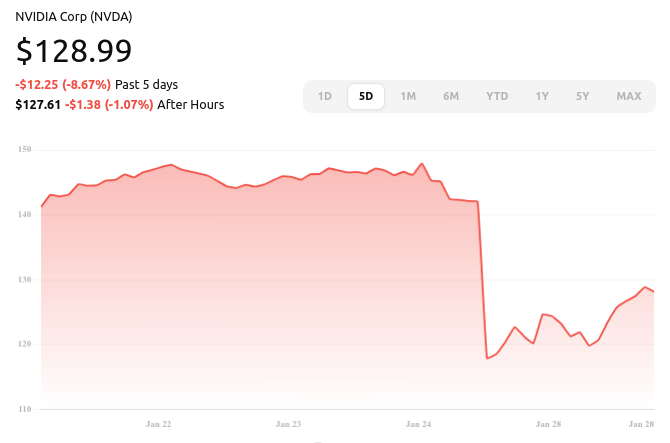
The NVIDIA Market Crash: A $600 Billion Shockwave
While AI enthusiasts debated Ollama’s independence and DeepSeek’s hidden motives, the stock market had its own reaction—a violent, record-breaking crash for NVIDIA.
The company, which had long dominated the AI chip market, had enjoyed soaring stock prices as AI models required ever-more-powerful GPUs (graphics processing units). But with DeepSeek proving that AI models could be trained more efficiently, and with alternative tools like Ollama reducing reliance on cloud infrastructure, investors panicked.
🚨 On January 27, 2025, NVIDIA lost nearly $600 billion in market capitalization—the largest single-day drop in U.S. stock market history. 🚨
This was not just about one company’s bad day. It signaled a paradigm shift—AI was evolving beyond the GPU-hungry models that NVIDIA had profited from. Could this be the beginning of NVIDIA’s decline?

DeepSeek: China's AI Wildcard
From behind the Great Firewall, China’s DeepSeek emerged like a shadowy figure in the night. Its AI model was powerful, efficient, and most importantly, cheap. While OpenAI had spent hundreds of millions of dollars training GPT-4, DeepSeek had allegedly created a competitive model for just $6 million. How? By using a technique called the "mixture of experts" approach, which allowed it to activate only the necessary parts of the AI during a task—saving massive computational power.
✅ Pros of DeepSeek:
- Unbelievably Cheap: Created at a fraction of the cost of competitors.
- Resource-Efficient: Uses smart computing strategies to optimize AI tasks.
- Open-Source Transparency: Model weights were made public, allowing researchers to use and modify them.
But not everything was as it seemed.
❌ Cons of DeepSeek:
- Censored Responses: Discussions about China’s politics, human rights, or controversial topics were strictly off-limits.
- Data Privacy Risks: Chinese AI firms are bound by strict government regulations, raising concerns about user data security.
The real question was: what was China’s endgame? Was DeepSeek just a technological advancement, or was it a strategic move in a bigger AI war?
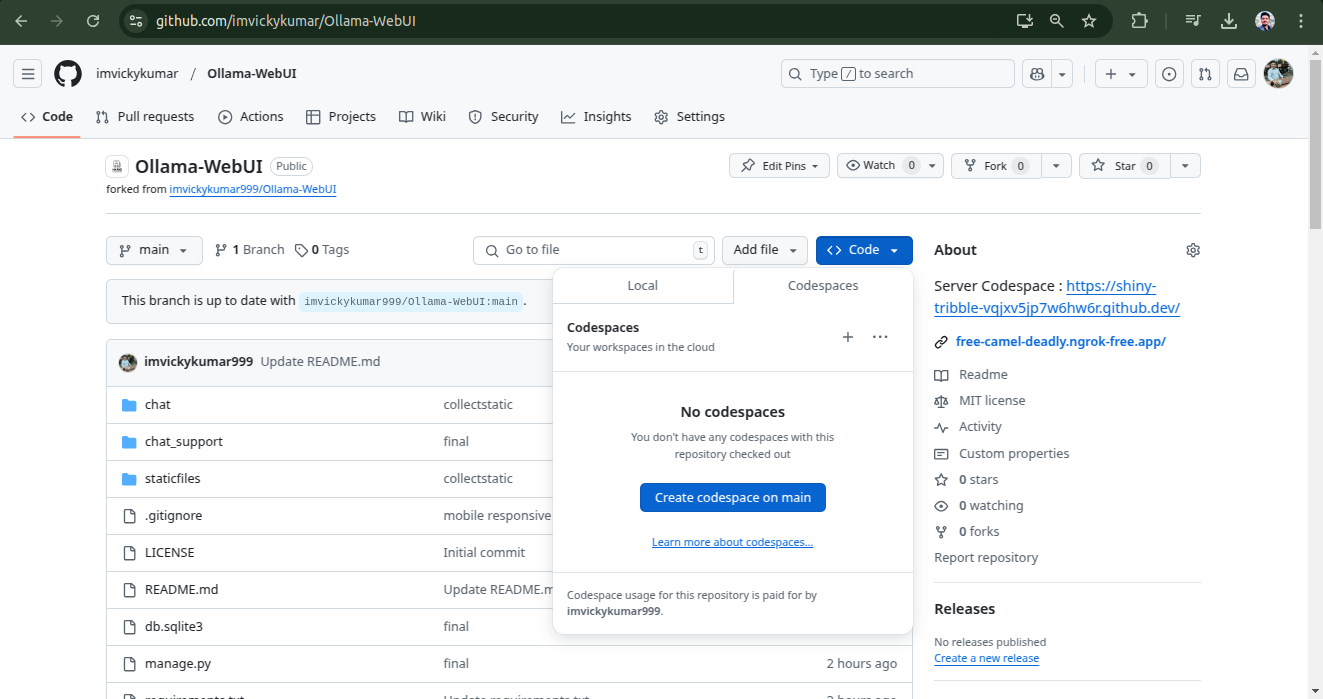
Step 1 : Fork this repo to explore and enhance Ollama WebUI
GitHub - imvickykumar/Ollama-WebUI/fork 🚀
Step 2 : Go to Codespaces to set up your development environment.
How to Open in Codespaces:
-
Navigate to your forked repository on GitHub.
- Click on the “Code” button (green button at the top right).
- Select the “Codespaces” tab.
- Click on “Create Codespace on main” to launch a new development environment.
Now, you can start coding directly in your browser with full access to the project! 🚀
Step 3: Run the Server in Codespaces Terminal
Once you're inside GitHub Codespaces, open the terminal and navigate to the project directory (if not already there).
Run the following command to start the Django development server:
python manage.py runserver 0.0.0.0:8000
What Happens Next?
- This command will start the Django server on port 8000.
- GitHub Codespaces will detect the running service and provide a public URL to access your application.
- Click on the provided URL to see your Ollama WebUI in action! 🚀
Step 4: Install and Run Ollama in a New Terminal
-
In GitHub Codespaces, click on the “+” button in the terminal section.
- Select “New Terminal” to open another shell instance.
Install Ollama
Run the following command to install Ollama:
curl -fsSL https://ollama.com/install.sh | sh
Start the Ollama Server
Once the installation is complete, start the Ollama server by running:
ollama serve
🎯 Next Steps:
- Your AI model should now be running!
- You can interact with the model directly in the terminal.
- If integrating with the Django app, make sure the backend is set up to communicate with Ollama’s API.
🚀 You're now running Ollama inside Codespaces! Ready to build something amazing? 😊
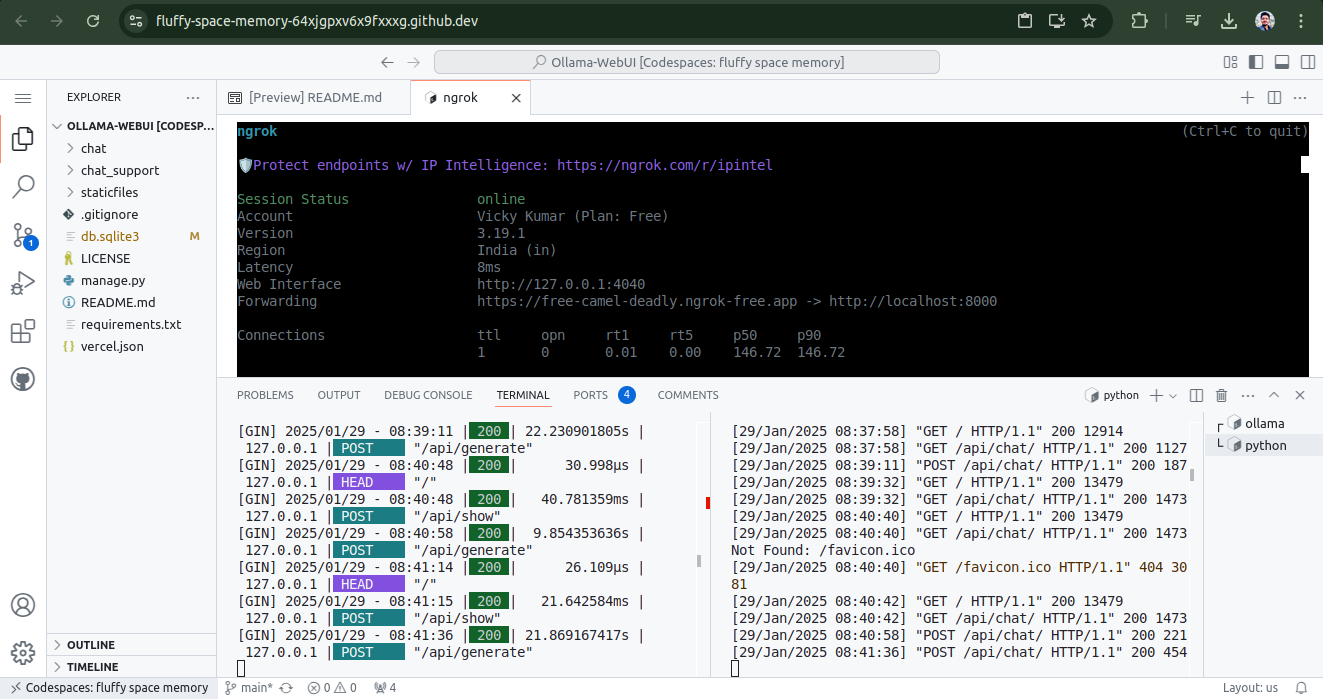
Step 5: Install and Configure Ngrok for Deployment
1. Install Ngrok via Apt
Run the following command in the new terminal to install Ngrok:
curl -sSL https://ngrok-agent.s3.amazonaws.com/ngrok.asc \
	| sudo tee /etc/apt/trusted.gpg.d/ngrok.asc >/dev/null \
	&& echo "deb https://ngrok-agent.s3.amazonaws.com buster main" \
	| sudo tee /etc/apt/sources.list.d/ngrok.list \
	&& sudo apt update \
	&& sudo apt install ngrok
2. Add Your Ngrok Authentication Token
Once Ngrok is installed, configure it by adding your auth token:
ngrok config add-authtoken 2izwMxxxxxxxxxxxxxxxxxxxxxxxxxxxxxqGi5h
(Replace the token with your actual Ngrok authtoken if different.)
3. Deploy Your App Online with Ngrok
Now, run Ngrok to expose your Django app to the internet:
ngrok http --url=free-camel-deadly.ngrok-free.app 8000
4. Visit Your Domain
Once Ngrok is running, it will provide a public URL that you can use to access your deployed app. Open your browser and visit:
https://free-camel-deadly.ngrok-free.app
🚀 Your Chatbot App is now live and accessible online! 🎉
🔹 Next Steps:
- Test your chatbot online.
- Share the link for feedback.
- Ensure Ngrok is running continuously to keep your app accessible.
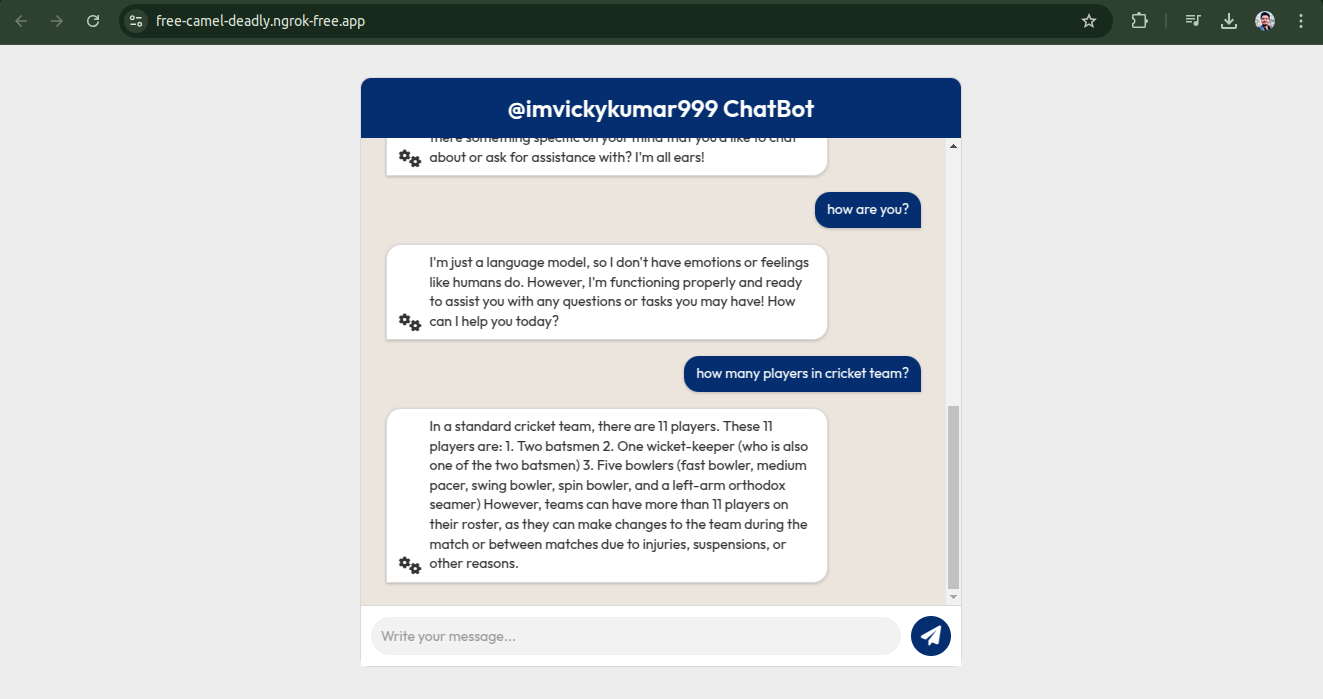
https://free-camel-deadly.ngrok-free.app/
⚠️ Note: If you are deploying your website using Ngrok, keep in mind that it will only remain accessible as long as the terminal is active.
Once the terminal is closed, the public URL will no longer be available. To keep your app live continuously, consider setting up a permanent deployment solution. 🚀
Let me know in the comment section if you need any modifications or troubleshooting! 😊


1 Comments
Khushi
Understands context, generates insightful responses, and enhances conversations with remarkable accuracy. A true revolution in human-AI interaction!"